Well I've been so focused on getting the tub in and shower ready that I've made a rather significant oversight. When the slowdowns started, the plan became get the shower done and then work on the rest. It made logical sense, but not linear sense. Here's why...
Before I put the Kerdi membrane over the cement board in the shower (yes I know, overkill) I have to have the ceiling taped and mudded. How else will I close the seam between the ceiling drywall and the cement board? BUT that also means I need to have the rest of the drywall up to join the vertical seams as well. You can't do that once the Kerdi is up never mind the tile. So now I have to finish the drywall first.
That means that I have to re-plumb the lines for the toilet and vanity soon that I planned because the drywall will cover it all so the changes have to happen now.
And I've also got new door boxes for the main and closet doors that have to go in. Before the drywall actually so the drywall can lay over the frame.
So what that means, is instead of getting ready to tile, I actually have to finish the plumbing on the toilet and vanity, install two doors, drywall the whole room, tape and mud, and at least prime the ceiling BEFORE I can go back to prepping for tiling the shower.
I wonder if I impale myself on a level will the insurance pay off....
Saturday, January 29, 2011
Friday, January 28, 2011
Light at the end of the tunnel! And I don't think it's a train...
Well there is finally some progress worth talking about. The tub went in yesterday and today I'll hook up the drains and give a water test. Naturally, it wasn't as easy as just dropping in a tub. The tub is an acrylic soaker tub which basically means it's a thin acrylic shell sprayed with fiberglass and a sheet of chipboard added to strengthen it. The downside is that if you don't support the bottom of the tub properly it will creak like mad and possibly get hairline cracks over the years.
The gap on my tub was 4 1/2" at one end to 3 1/2" at the other. This means that while the top of the tub is level, the bottom is angled for good drainage. The best way to support the tub is with a bed or mortar (Quikrete Masonry Mortar S type was what I used) but I didn't want to put down enough mortar to fill that kind of gap. It would be 150+ pounds and combine that with personal weight plus water and you get a lot of weight. Luckily my tub is pretty much directly over a support wall with 1 1/2" subfloor so I'm not too worried. Still I figured that making a platform to take some of the height would be better. So here is my mortar bed support Mk. II (yes there was a Mk. I - we won't talk about that):

Note that I've matched the 3 degree slant of the tub to the support. I've also added 3 key strips to help lock the mortar in place. Now there is the possibility that this tub may come out at some point (long after I'm dead 'cause I ain't doing this again anytime soon) so it wouldn't be good to have the mortar stick to anything. We just want it to provide support. So, the bottom of the subfloor get some 6 mil poly laid over it (the Tuck tape was to make sure it didn't catch on the tub when moving it in and cause the poly to roll up):

The base is screwed to the floor so that it neither goes anywhere, but it can be removed if required. To keep the mortar from sticking to the tub, more poly is applied there:

You can also see the insulation that I've added to help keep the water hot. A full strip on the front and a partial on the side. No room for insulation on the back. I'm using Roxul stone fiber insulation because it's water proof and being actually made from volcanic stone, it will not harbour mould:

Then I mixed up some mortar (anyone who thought I didn't need one of these you were wrong. Na-na-na-boo-boo!) to a fairly thick consistency and made an angled mound on the support:


With that done I raised the tub up, slid it in on an angle and placed it down. Then I squished it around (the tub that is) and stood in in just to let it sink in. Some say that you should fill the tub with water so that the mortgar hardens as if someone were in there, but I've done some checking and I don't think that's the best way to go. Think about it, you add a couple of hundred pounds of weight and let it set. Then you take the weight off. What if the tub rises back up a bit? You've got a ton of mortar and you still have a squeak. The support is there, but I bet it'll be noisy. Since I confirmed it was level in both planes (which it was) and then doubled checked the drainage slope in the bottom was still good (which is was) I didn't see any reason to weight the tub while the mortar dried.. And there's tub (that's not damage on the right side, its where I tore back the protective coating to check a mark):

And if you're thinking I forgot the drain waste outlet on the tub, I didn't. I have space to attach it from below. See the height of the tub and the base prevented me from putting it on before the tub was installed. Also, while you can't see it there are support strips running on all the wall to catch the lip of the tub. However, because it's fiberglass, the underside is not uniform. There is full contact in some areas, and none in others. I'll remedy that by applying a low expansion hard setting insulating foam between the tub lip and the supports.
I've also completed my leak tests and it's all green lights - no issues with tub, drain plug or drain lines. Now I'm in for the fun stuff, final attachments to secure the tub, put on the drain waste outlet plumbing, do a leak check, finish the niches to hold shampoo and stuff, put up cement board and then Kerdi membrane. Oh the fun.
Wednesday, January 26, 2011
Kübler-Ross (stages of denial)...
Tuesday didn't happen. I don't mean I didn't do anything, I spent the entire day plumbing and moving studs. What I mean is that I spent the entire day fixing other people's mistakes so that I could actually move forward. Let me explain...
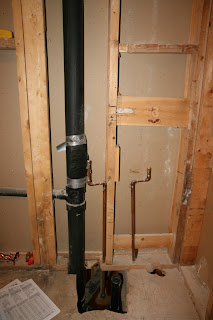
The day started well with sanding the floor. Got it all done in half and hour and I felt great. Then I started to look at the plumbing for the shower. It wasn't long before I noticed the existing plumbing was, shall we say, not the best job. Okay, let's be honest. It must have been "Take your kid to work day" when they did the plumbing here and junior spent the morning sniffing propane fumes and then decided to try a little plumbing himself. In my version of these events junior either incinerates himself with the torch or drowns in the wash basin later that day. Either one makes me feel better.
I mean seriously, if you look at this full size, you can see they did a double "T" for no good reason and bent both pipes to fit rather than drill holes in the right place.

So, I had to cut the strapping away from my basement to get to the pipes, change the lines (for the better), add new shutoff valves on both the hot and cold lines:

It doesn't look like much, but cutting away strapping, pulling unions off the main line, all this stuff takes time.
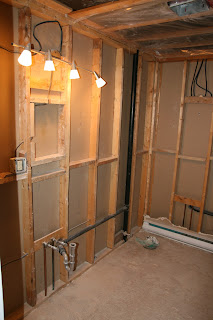
And then I had to move a stud in the wall because it was exactly where the new tub's valve control needed to be. To make sure I didn't damage the drywall on the other side, I had to run the reciprocating saw between the drywall on the other side and the stud to cut the nails. There's 16" between studs and the saw is nearly 2'. You do the math and figure out how much fun that can be. So it started like this:
And ended up like this (for those in the know, yes there needs to be bracing, it's already added but not in this picture):

Essentially, I spent 12 hours working on this and at then end of the day I was exactly where I started (ready to plumb the shower) except things were done correctly now.
Which lead me to the title of this post..dealing with grief.
Stage 1 Denial - This isn't going to set me back, I'll still get it all done in time. I'll just stop sleeping.
Stage 2 Anger - Who the hell let drunken monkeys plumb this place? Was the inspector on crack? Son of a bitch.
Stage 3 Bargaining - Okay, just let me get the tub in and the shower working. If it takes another week to finish the bathroom that will be fine. No one will mind the plywood floor.
Stage 4 Depression - Stupid Blog. No one would know about my stupid house with it's stupid plumbing if not for this stupid Blog. How do I delete this thing?
Stage 5 Acceptance - Oh look! There's coconut rum in the cupboard. This isn't so bad after all. Now where is the pineapple juice...
The day started well with sanding the floor. Got it all done in half and hour and I felt great. Then I started to look at the plumbing for the shower. It wasn't long before I noticed the existing plumbing was, shall we say, not the best job. Okay, let's be honest. It must have been "Take your kid to work day" when they did the plumbing here and junior spent the morning sniffing propane fumes and then decided to try a little plumbing himself. In my version of these events junior either incinerates himself with the torch or drowns in the wash basin later that day. Either one makes me feel better.
I mean seriously, if you look at this full size, you can see they did a double "T" for no good reason and bent both pipes to fit rather than drill holes in the right place.

So, I had to cut the strapping away from my basement to get to the pipes, change the lines (for the better), add new shutoff valves on both the hot and cold lines:

It doesn't look like much, but cutting away strapping, pulling unions off the main line, all this stuff takes time.
And then I had to move a stud in the wall because it was exactly where the new tub's valve control needed to be. To make sure I didn't damage the drywall on the other side, I had to run the reciprocating saw between the drywall on the other side and the stud to cut the nails. There's 16" between studs and the saw is nearly 2'. You do the math and figure out how much fun that can be. So it started like this:

And ended up like this (for those in the know, yes there needs to be bracing, it's already added but not in this picture):

Essentially, I spent 12 hours working on this and at then end of the day I was exactly where I started (ready to plumb the shower) except things were done correctly now.
Which lead me to the title of this post..dealing with grief.
Stage 1 Denial - This isn't going to set me back, I'll still get it all done in time. I'll just stop sleeping.
Stage 2 Anger - Who the hell let drunken monkeys plumb this place? Was the inspector on crack? Son of a bitch.
Stage 3 Bargaining - Okay, just let me get the tub in and the shower working. If it takes another week to finish the bathroom that will be fine. No one will mind the plywood floor.
Stage 4 Depression - Stupid Blog. No one would know about my stupid house with it's stupid plumbing if not for this stupid Blog. How do I delete this thing?
Stage 5 Acceptance - Oh look! There's coconut rum in the cupboard. This isn't so bad after all. Now where is the pineapple juice...
Monday, January 24, 2011
Glue and glue remover...
At the end of day 3 I didn't get quite as much done as I'd hoped but I had my adventures nonetheless. I started the day off by making the cut outs in the drywall for the fan and lights and putting the last of the screws in. That went fairly smoothly - except for the part where the pilot bit for my cut out tool broke off and I sliced through the drywall with the same gay abandon as John Belushi's samurai in a delicatessen. But with a new pilot bit all was well and the ceiling is up and cut out. And no, that charming light is not staying - just temporary lighting:

Next step was to get the glue residue off the subfloor. Glue residue you say? But didn't you have tile? Yes. And the morons that laid it put it down with carpet glue. Yeah I said carpet glue. 'Cause I guess soft carpet that comes in rolls and hard tile that comes in pieces are so similar they mixed it up. Could happen. If you're an idiot.
I did a lot of research and found a product called Super Stripper (insert your own dirty joke here) that was effective but didn't result in the lining of your lungs being liquefied either. And it worked great, lifted 90% of the glue up. So effective in fact it started to dissolve the glue that held the layers of the plywood subfloor together. Needless to say with the potential of having sections of my subfloor dissolve apanicked well thought out plan was needed. I have to say though, all I could think of was the scene in "Alien" when a drop of the acid blood starts eating it's way through the decks of the Nostromo. Surely it wasn't going to do that to the subfloor? Right?
Using at first drywall trowels, and then moving up to full scale war with a shovel, I started scrapping up the toxic goo and then frantically moping with water (water neutralizes it). The whole time I'm sliding around like I'm in a room full of banana skins or the snot from 173 six year olds, whichever visual ismost least upsetting to you. Finally I got things under control only to suddenly wonder what a stripper of that power is doing to the soles of my shoes. Freaking out Calmly I got out the bathroom careful not to step on the hall floor, or the stairs or anything else. And I certainly didn't nearly melt part of the carpet. Certainly not. Nope. Not a bit.
Checking my shoes I discovered a mix of hardening carpet glue and enough hair from my Huskies so that it looked like I was wearing shoes by Hobbit. Being concerned that the Middle Earth look was on it's way out, I spent some time with a wire brush and slot screwdriver until my shoes are suitable for inside wear again. The floor has not dissolved, and most of the glue is gone. A little sanding tomorrow morning and the floor will be ready for tile. Which would be great if I was tiling tomorrow - but I'm not. No, tomorrow is plumbing. When I'll entertain all the little children with tales of the Great Soaker Tub and the Evil Corroded Pipes!! But have no fear!! "L" Grade Copper, Lead-less Solder and Flux will save the day!! You know I could be wrong, but I think there are still some fumes coming from that stripper (again, insert your own dirty joke here)...

Next step was to get the glue residue off the subfloor. Glue residue you say? But didn't you have tile? Yes. And the morons that laid it put it down with carpet glue. Yeah I said carpet glue. 'Cause I guess soft carpet that comes in rolls and hard tile that comes in pieces are so similar they mixed it up. Could happen. If you're an idiot.
I did a lot of research and found a product called Super Stripper (insert your own dirty joke here) that was effective but didn't result in the lining of your lungs being liquefied either. And it worked great, lifted 90% of the glue up. So effective in fact it started to dissolve the glue that held the layers of the plywood subfloor together. Needless to say with the potential of having sections of my subfloor dissolve a
Using at first drywall trowels, and then moving up to full scale war with a shovel, I started scrapping up the toxic goo and then frantically moping with water (water neutralizes it). The whole time I'm sliding around like I'm in a room full of banana skins or the snot from 173 six year olds, whichever visual is
Checking my shoes I discovered a mix of hardening carpet glue and enough hair from my Huskies so that it looked like I was wearing shoes by Hobbit. Being concerned that the Middle Earth look was on it's way out, I spent some time with a wire brush and slot screwdriver until my shoes are suitable for inside wear again. The floor has not dissolved, and most of the glue is gone. A little sanding tomorrow morning and the floor will be ready for tile. Which would be great if I was tiling tomorrow - but I'm not. No, tomorrow is plumbing. When I'll entertain all the little children with tales of the Great Soaker Tub and the Evil Corroded Pipes!! But have no fear!! "L" Grade Copper, Lead-less Solder and Flux will save the day!! You know I could be wrong, but I think there are still some fumes coming from that stripper (again, insert your own dirty joke here)...
Friday, January 21, 2011
In the beginning...
So what is this blog about? Am I desperately looking for friends or fame? Struggling to communicate with an ever distant world? No of course not. What are you, nuts?
This is plain and simple the easiest way that I can document my bathroom reno for friends and family to see without having to send a ridiculous amount of emails with pictures and descriptions only to have half of the emails bounce back because the files are too big. So Blog to the rescue.
Oh and for those who are wondering about the name, my boss calls me Squeaky because I'm careful with my money. Frugal. Okay, I'm cheap and can't stand parting with money. Well that, and I like my web anonymity.
With that out of the way, let's get to business. I've got a 9x5 bathroom (not including shower/tub alcove and linen closet) that desperately needed to be updated. How desperately? I can't actually show you the bathroom as a whole - you would go mad. Instead the best I can do is picture of the wallpaper lining the inside of the vanity (which by the way appears to have been made either in the 1700's by a blind leper, or in the 1970's by a drunken contractor with basic math issues)

Don't you just love that wall paper? Evey time my better half (known as the Task Mistress or just TM) open the doors she starts singing the them to "Three's Company"...Come and knock my door...
And if that didn't sell you on a reno, check out a section of the mosaic tile floor. Just look at the tile. What more can I say? Just wow. Like how much dope where they smoking when they did this place? Seriously.

It wasn't going to work to just do an update, nope. This was going to have to be a gut. So join me if you will (and go piss off if you won't) on my renovation adventure. I have two main goals - Get this done and make TM happy and please, don't let me end up on some HGTV show where I get rescued by Bryan Baulmer or Mike Holmes.
Oh, and as you may be able to tell, this blog is 50% DIY and 50% puredrivel comedy. If you just want to see my progress and laugh at my misery feel free to skip the DIY. Although I will think of you as less of a person for it.
If you plan to do your own bathroom reno, you may reach a point where you feel like you're over your head. That's okay. Not everyone is handy, and knowing when you're in too deep is not a bad thing. That being the case, you may ask yourself at what point have I gone too far? When is it too late to back out? When is it that a little plaster and paint and a new picture won't put this right? Well, it's about here:
And there used to be tub over here too:

Where is the tub? It's out on the deck. In two pieces. The process was oddly satisfying. Sort of like "Dexter" meets "Bathtastic" only with less blood and no annoying hosts:

So that's where I am today. Destruction and cleanup.Boring as all hell Totally exciting, yes? Next update will be pictures of the ceiling which has been drywalled (with some help - thank you Dean), then new plumbing and then the tub goes in. I'm so excited. Not really. Actually when the tiling starts, then it will be terrifying exciting.
Now, where are the band-aids and Advil? I've got more work to do...
This is plain and simple the easiest way that I can document my bathroom reno for friends and family to see without having to send a ridiculous amount of emails with pictures and descriptions only to have half of the emails bounce back because the files are too big. So Blog to the rescue.
Oh and for those who are wondering about the name, my boss calls me Squeaky because I'm careful with my money. Frugal. Okay, I'm cheap and can't stand parting with money. Well that, and I like my web anonymity.
With that out of the way, let's get to business. I've got a 9x5 bathroom (not including shower/tub alcove and linen closet) that desperately needed to be updated. How desperately? I can't actually show you the bathroom as a whole - you would go mad. Instead the best I can do is picture of the wallpaper lining the inside of the vanity (which by the way appears to have been made either in the 1700's by a blind leper, or in the 1970's by a drunken contractor with basic math issues)

Don't you just love that wall paper? Evey time my better half (known as the Task Mistress or just TM) open the doors she starts singing the them to "Three's Company"...Come and knock my door...
And if that didn't sell you on a reno, check out a section of the mosaic tile floor. Just look at the tile. What more can I say? Just wow. Like how much dope where they smoking when they did this place? Seriously.

It wasn't going to work to just do an update, nope. This was going to have to be a gut. So join me if you will (and go piss off if you won't) on my renovation adventure. I have two main goals - Get this done and make TM happy and please, don't let me end up on some HGTV show where I get rescued by Bryan Baulmer or Mike Holmes.
Oh, and as you may be able to tell, this blog is 50% DIY and 50% pure
If you plan to do your own bathroom reno, you may reach a point where you feel like you're over your head. That's okay. Not everyone is handy, and knowing when you're in too deep is not a bad thing. That being the case, you may ask yourself at what point have I gone too far? When is it too late to back out? When is it that a little plaster and paint and a new picture won't put this right? Well, it's about here:

And there used to be tub over here too:

Where is the tub? It's out on the deck. In two pieces. The process was oddly satisfying. Sort of like "Dexter" meets "Bathtastic" only with less blood and no annoying hosts:

So that's where I am today. Destruction and cleanup.
Now, where are the band-aids and Advil? I've got more work to do...
Subscribe to:
Posts (Atom)